


Embark on a journey into the heart of automotive craftsmanship with our ultimate guide to front-end assembly for cars. From the iconic grille to the precision-engineered headlights, uncover the secrets behind designing and assembling the face of your vehicle for maximum impact and performance.
What is Front-End Assembly?
 What is Front-End Assembly
The front-end assembly, encompassing the steering and suspension systems, must be tightly secured, ensuring solidity and security, with both metal and soft components in optimal condition. Its crucial importance lies in facilitating precise steering control and maintaining vehicle stability and comfort during operation.
Components of Front-End Assembly
Steering system
 Steering system
The steering system guides the vehicle’s direction via components like the steering wheel, column, gear, tie rods, and steering knuckles. Power steering systems reduce steering effort, enhancing driver comfort, with modern vehicles often featuring electronic power steering (EPS).
Suspension system
 Suspension system
The suspension system supports the vehicle’s weight, absorbs road shocks, and maintains optimal tire contact. Suspension tuning handling, and stability, with adjustments for various driving conditions.
What parts make up the steering and suspension system?
These systems are intricately interconnected. Depending on the make and model of the vehicle, you will encounter the following front-end assembly components:
Parts of the Steering System:
 Parts of the Steering System
- Drag link and center arms
- Axial rods
- Tie rod ends
- Pitman’s arm
- Steering rack gaiters (similarly called of bellows and boots)
- Steering wheel
- Steering column
- Steering coupler
- Steering gear
- Power steering hoses
- Power Steering pump
- Intermediate Shaft
- Pinion
- Steering rack
- Steering knuckle
- Idler arms
- Pitman’s arm
- Steering Yoke/Dumper
- Steering coupler
- Steering box
- Steering gearbox
- Drag link
- Tie Rod end
- Spring seat
- Rack and pinion Case
- Pinion gear
- Rack gear
- Steering links
Parts of Suspension System:
 Parts of Suspension System
- Ball joints
- Link stabilisers
- Control Arms
- Bushes
- Strut mounts
- Wishbones
- Tires
- Springs
- Shock absorbers
- Spindles
- Sway bars
- Stabilizer bar
- Bumper
- Lateral Control Rod
- Upper Arm
How Does the Front End Work?
The front end of the vehicle functions by coordinating various components, including the steering system, which translates the driver’s input from the steering wheel into lateral movement of the front wheels, and the suspension system, which absorbs shocks, supports the vehicle’s weight and maintains tire contact with the road for traction and stability. These systems work together seamlessly: when the driver turns the steering wheel, the suspension adjusts to keep the wheels grounded, ensuring smooth and controlled driving through turns and over uneven surfaces.
Methods for Examining the Front-End Assembly for Damage and Wear
Steering system
 Steering system
Flexible Steering Joint
- Rag Joint: Ensure the integrity of the flexible coupling connecting the steering shaft to the steering gear. Replace if damaged or deteriorated.
- Flexible joint: inspect and replace if the joint binds, exhibits excessive looseness, or shows signs of rust.
Idler Arm
- Thoroughly examine attachment points for damage, bends, and twists, Check for wear in ball joints and bushings
Outer tie rods
- Test for looseness by steering the wheels back and forth, and check for play in the ball joint stud.
Pitman Arm
- Check for a tight fit to the steering gear or sector shaft, as well as for bends, twists, and wear in joints.
Power steering systems
- Inspect the pump, belt, and hoses for leaks, damage, or signs of wear or deterioration.
Rack and Pinion Style Inner Tie Rods
- Rock the steering wheel side to side to detect wear in the inner socket.
Spindle
- Check the ABS plug for damage and ensure the ABS wire remains secured to the spindle.
Steering Arm
- Measure the distance from the brake rotor to the ball joint and compare measurements from side to side to detect a bent steering arm.
Steering Column
- Inspect mounting points for damage and rock the steering wheel to check for abnormal movement or noise.
Steering center link
- Observe center link joints while an assistant steers the front wheels back and forth to detect any unacceptable looseness. Check for signs of impact or bends.
Steering Gearbox
 Steering Gearbox
Rack and Pinion
- Check for rack looseness by attempting to move it up, down, and side to side. Replace cracked or damaged insulator bushings
- Inspect the rack for housing cracks and cracked or broken mounting ears.
- Squeeze the bellows boot to check for power steering fluid leaks.
- Examine tie rod ends for damage and check for pinion shaft end-play and excessive steering wheel free play.
- Inspect the housing for corrosion or leaks.
Parallelogram or Relay Rod
- Inspect the pitman arm to steering box output shaft connection for loose bolts or worn splines.
- Check for noises, binding, uneven turning effort, looseness, hard steering, and fluid leakage.
Steering Knuckle
- Measure from a straight edge on the brake rotor to several points on the steering knuckle to detect a bent knuckle.
- Check for signs of flaking coatings or corrosion, and discard any knuckle showing signs of previous repair. Also, inspect for cracks, twisted ears, and damaged attachment points.
Steering Linkage
 Steering Linkage
Vehicle on Ground
- Have an assistant rock the steering wheel while checking for lateral looseness in the steering linkage.
Vehicle Weight Off Front Tires
- Steer each font wheel by hand to identify components with excessive lateral movement.
- Rotate steering linkage components by hand to check for binding of ball joints and excessive vertical movement.
Steering wheel
- Inspect for cracks, bends, and damage resulting from airbag deployment.
Repairing steering system
Tools and Materials Needed:
- Floor jack and jack stands
- Lug wrench
- Wrench and socket set
- Tie rod end remover tool
- Ball joint separator
- Hammer
- Pry bar
- Penetrating oil
- Replacement steering parts (such as tie rod ends, steering rack, steering pump, and steering column components)
1. Inspect Steering Components:
 Inspect Steering Components
- Inspect the tie rod ends, steering rack, steering pump, and steering column components for damage or wear.
- Look for signs of leaks, worn boots, or play in the steering.
2. Replace Damage Parts:
 Replace Damage Parts
Start with one component at a time to avoid confusion.
- Tie Rod Ends:
- Use a tie rod end remover tool to loosen and remove the old tie rod ends from the steering knuckles.
- Install the new tie rod ends and tighten them to specifications.
- Steering Rack:
- Disconnect the tie rod ends from the steering rack.
- Unbolt the steering rack from the vehicle frame.
- Install the new steering rack and reconnect the tie rod ends.
- Tighten bolts to specifications.
- Steering Pump:
- Drain the power steering fluid from the system.
- Unbolt the old steering pump and remove it from the vehicle.
- Install the new steering pump and tighten bolts to specifications.
- Refill the power steering fluid and bleed the system if necessary
- Steering Column Components:
- If there are issues with the steering column, such as loose or worn components, these may need to be replaced.
- Disassemble the steering column as needed, replacing any damaged or worn parts.
- Reassemble the steering column and tighten the bolts to specifications.
3. Torque Specifications:
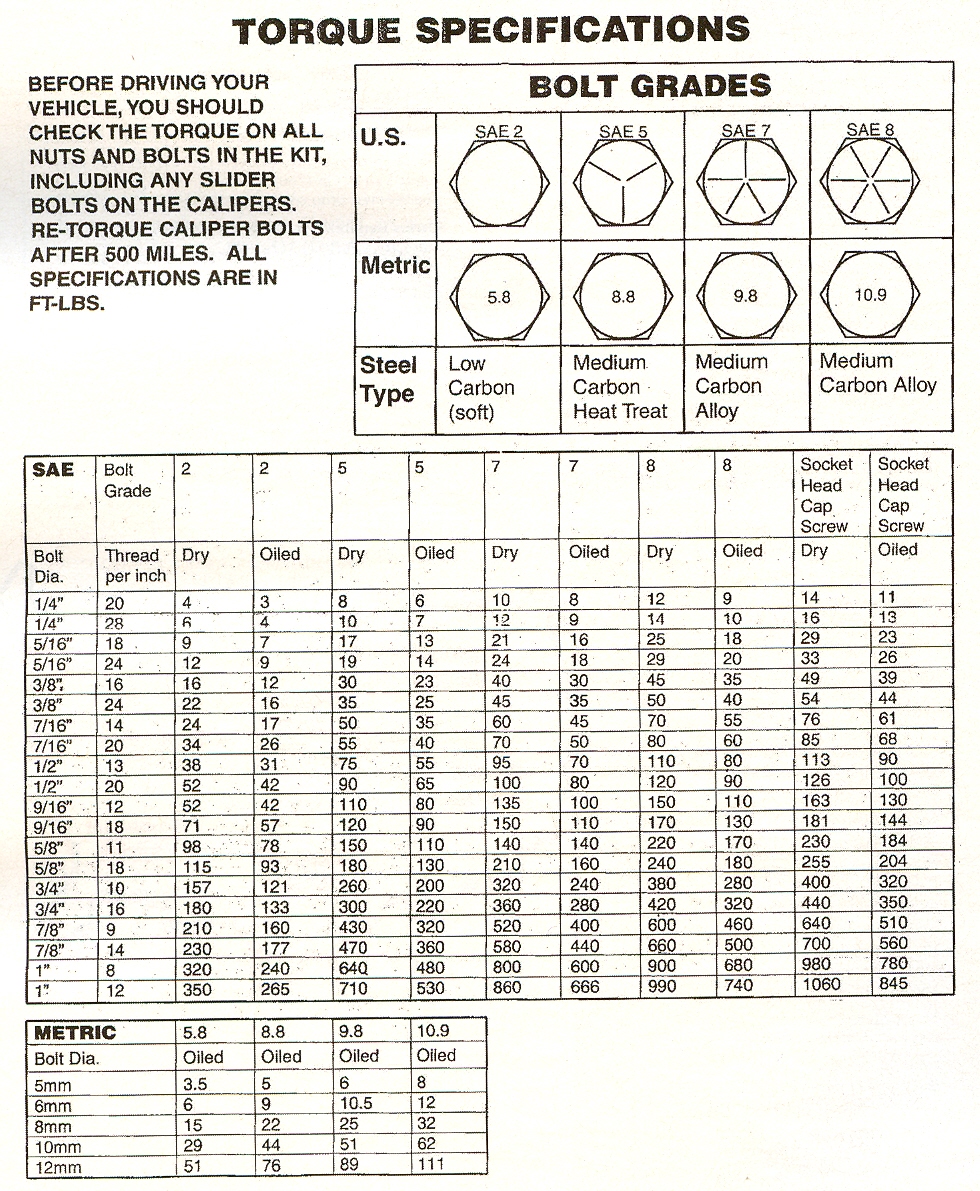 Torque Specifications
- Use a torque wrench to tighten all bolts to the manufacturer’s specifications.
- This is crucial for the safety and proper function of the steering system.
4. Reinstall Wheels:
 Reinstall Wheels
- Put the front wheels back on and hand-tighten the lug nuts.
- Lower the vehicle from the jack stands.
- Tighten the lug nuts in a star pattern with a lug wrench.
5. Wheel Alignment (Recommended):
 Wheel Alignment (Recommended)
- After replacing the steering components, a wheel alignment is recommended.
- This ensures proper tire wear and vehicle stability.
- You can either take the vehicle to a shop for alignment or use a wheel alignment tool if you have one.
6. Test Drive:
 Test Drive
- Take the vehicle for a test drive to ensure the steering feels responsive and there are no unusual noises.
- Pay attention to the vehicle’s handling and steering wheel alignment.
7. Final Checks:
 Final Checks
- Double-check all bolts and nuts for tightness.
- Ensure there are no loose components.
- Check for any leaks in the power steering system.
Always refer to the vehicle’s service manual for specific instructions on torque specifications
Suspension System
Ball Joints
 Ball Joints
- Check for axial (up and down) and radial (side-to-side) play by raising the vehicle under the lower control arm (load-carrying ball joint) or frame if the upper ball joint is loaded or both upper and lower ball joints are unloaded.
- Test for axial movement by prying up on the tire to check for free-play
- For radial movement, use hand pressure only to move the tire and wheel assembly in and out at the 12 o’clock and 6 o’clock positions.
- Look for any movement between the wheel knuckle and both lower arms at the lower ball joints. If no movement is detected, the ball joints are deemed okay.
Wear Indicator Design
 Wear Indicator Design
- Except for Chrysler: this design utilizes a collar protruding from the base of the ball joint around the grease fitting. The collar slides upward into the housing of the ball joint as it wears down. If, when the vehicle is loaded, the collar reaches beyond the ball joint housing, then the inspection is considered successful. If the ball joint is flush with the face or recessed, it needs to be replaced.
- Chrysler wear indicator design – While the car is in motion, use your fingers to wiggle the grease fitting. If the grease fitting becomes loose, it is necessary to replace the ball joint. If the ball joint has ripped boots and moves noisily or blindingly, you should throw it out.
Brake caliper
 Brake caliper
- Loosen the bleed screw after inspecting it.
- Check for damage to the piston and dust seal.
Bushings
 Bushings
- Find any signs of damage, pollution, or cracks in the rubber bushings by visually inspecting them.
- Find any loose metal bushings to see if they are worn.
- There should be no back-and-forth movement in the bushings of the control arms.
Coil Springs
 Coil Springs
- Find any springs that are bent, broken, or worn out. Check the jounce bumpers for signs of wear and tear that could be a sign of spring fatigue.
- Check for any signs of pitting or severe corrosion.
CV drive axle
 CV drive axle
- Check the CV drive axle’s boot and ABS ring for any signs of damage.
- Check for damage to the threads on the shaft’s end.
Front locking hubs
 Front locking hubs
- Look for signs of wear and tear, such as fluid leaks, cracks, and blinding components.
- Look for signs of water seepage and greasy contamination.
Leaf Spring
 Leaf Spring
- Check for damage or indications of stress on the spring weye, shackles, and u-bolts, as well as the leaf springs.
- Verify that the bushings are not cracked or worn.
Lower control arm
 Lower control arm
- Find the distance between the bottom control arms and the spring seat of the arm by placing a straight edge under them and measuring up from there.
- A cocked lower control arm is indicated by any discrepancy.
- Make sure that there is no physical damage to the bushings, ball joints, or attachment points.
Multi-link suspension
 Multi-link suspension
- Check the tightness of each link rod by giving it a good shake with your hands.
- Look for bushings that are worn or damaged.
Shock absorbers
 Shock absorbers
- Look for any mounting hardware that is loose, damaged, or broken.
- Replacement is necessary if there is excessive exterior fluid leakage. Check for leaks in the strut housing.
Strut
 Strut
Strut- Check the housing and mounting tower for any signs of damage or leaks. To find a bent cartridge, measure from the hub face’s straight edge to two symmetrical spots on the strut.
- Look for excessive movement, binding, or clunking in the cartridge.
Strut bearings
 Strut bearings
- To find the vertical play, raise the car by its frame and probe under the tire. To check the lateral play, just insert and remove the tire from the top.
- To check if the bearings on the strut plates are binding, turn the wheel.
Torsion bars
 Torsion bars
- Verify that there is no wear and tear, broken parts, or loose fasteners.
Wheel bearings
 Wheel bearings
- To check if the tire is loose, raise the car and rock it in and out from above.
- Keep an eye out for indentations when visually evaluating the race.
Repairing suspension system
 Repairing suspension system
Tools and Materials Needed:
- Floor jack and jack stands
- Lug wrench
- Wrench and socket set
- Torque wrench
- Ball joint separator
- Hammer
- Pry bar
- Penetrating oil
- Replacement suspension parts (such as control arms, bushings, ball joints, shocks/struts, tie rods, sway bar links)
- Wheel alignment tool (optional)
1. Safety First:
 Safety First
- Park the vehicle on a flat, level surface.
- Engage the parking brake.
- Chock the rear wheels to prevent rolling.
- Wear safety glasses and gloves.
2. Jack Up the Vehicle:
 Jack Up the Vehicle
- Loosen the lug nuts on the front wheels slightly.
- Use a floor jack to lift the front of the vehicle.
- Place jack stands under the frame’s designated lift points.
- Lower the vehicle onto the jack stands.
3. Remove the wheels:
 Remove the wheels
- Completely remove the lug nuts and take off the front wheels.
4. Replace Damaged Parts:
 Replace Damaged Parts
- If any components are damaged or worn, they will need to be replaced.
- Start with one component at a time to avoid confusion.
- Here’s a general guide for common components:
- Control Arms:
- Unbolt the control arm from the frame and knuckle.
- Use a ball joint separator to separate the ball joint from the knuckle.
- Install the new control arm and tighten bolts to manufacturer specifications.
- Bushings:
- Use a press or a bushing removal tool to remove old bushings.
- Press in the new bushings using a bushing installation tool.
- Ball Joints:
- Remove the old ball joint by unbolting it from the control arm.
- Install the new ball joint and tighten to specifications.
- Shocks/Struts:
- Supports the lower control arm with a jack.
- Remove the bolts securing the shock/strut to the knuckle and body.
- Install the new shock/strut and tighten bolts to specifications.
- Tie Rods:
- Loosen the jam nut and remove the tie rod end from the steering knuckle.
- Replace with a new tie rod end and tighten to specifications.
- Sway Bar Links:
- Remove the old sway bar links from the sway bar and control arm.
- Install the new sway bar links and tighten them to specifications.
- Control Arms:
Price for Replacing Front End Assembly
 Price for Replacing Front End Assembly
The cost of replacing the front-end assembly varies based on factors like vehicle type, parts needed, and labor rates. Generally, parts can range from a few hundred to over a thousand dollars, and labor costs depend on complexity. For an accurate estimate, consult a mechanic or repair shop.
Do all Components Wear at a Similar Rate?
Although suspension parts are subjected to similar mileage, certain components experience accelerated wear. Factors such as frequent encounters with cubs or potholes and bearing heavier loads contribute to this discrepancy. Loaded ball joints, for instance, endure heightened stress and degrade more rapidly than their unloaded counterparts.
Maintaining vigilance over front-end suspension repairs is crucial. A single worn component can cascade into issues affecting adjacent parts, amplifying stress, and strain throughout the system. With driver safety as the paramount concern, addressing front-end problems promptly ensures the vehicle operates safely and optimally.

